With our home remodel at about 90% complete, I have been having fun decorating the rooms in our new place. It’s a completely different vibe than our last home, where we lived for over 14 years. The colors are different, the style is different, so of course that meant I had the perfect excuse to dive into new furniture and decor. When it came to tackling my office, I wanted something girly, something glam, and something bright and fun. I decided to go with a white desk with gold accents, a white furry rug, a glam chandelier, a cozy tufted daybed with bedding in shades of pink, and lots of fun decor.

It’s been taking longer than I initially anticipated to complete this room, mostly because it’s lower on the priority list (I need my kitchen pantry and my master bedroom closets done first!), but also because I’m starting from scratch. I’ve had to search for the right pieces that I have pictured in my head, which has proved to be more difficult than I thought it would. I mean, I have the internet in the palm of my hands, I should be able to find anything I want, right?
Not so. Well, not so in my price range is probably a more accurate statement.
Recently I had been looking for a bookcase, and had an idea in my head of what I wanted, but couldn’t find it. And the bookshelves that came close were a bit steep – after remodeling an entire house, I was trying to keep my office decorating costs as low as possible. Pinterest to the rescue: I found a couple pins about bookcase “hacks” using cheaper shelving from places like Ikea and doctoring them up with paint and contact paper. I was in Target, looking at what they had and came across this shelf and immediately thought that it would be perfect…with a little paint and contact paper!

To create the look I wanted, I picked up 2 cans of gold spray paint, and ordered 4 rolls of marble contact paper from Amazon:
d-c-fix 346-0306 Decorative Self-Adhesive Film, Grey Marble, 17.71″ x78″ Roll

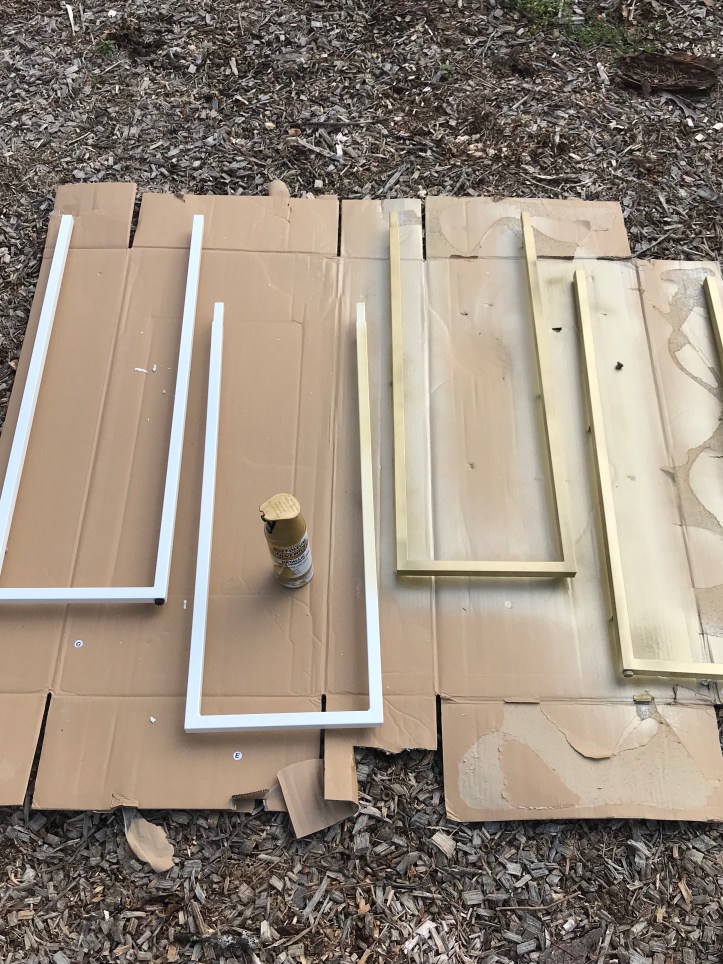
I started with pulling all of the parts out of the box and reading the instructions. Yes, I actually did that! I wanted to make sure I understood how the parts went together before I started to modify them. There were 4 white metal pieces in the box that would ultimately be the frame of the shelf. I pulled these out, put them on a large piece of cardboard, and made sure to label the part numbers on the cardboard. Each piece had a sticker indicating which part it was (E, F, G, and H) so I peeled the stickers off and placed them on the cardboard next to each piece. Then I took it all outside and painted it with gold spray paint. Each side got 2 coats, and 2 cans was the perfect amount. It took a full 2 days to paint and dry, as I wanted it to be completely dry in between coats, then I let it rest another day before assembling it.
While waiting for the frame pieces to dry, I covered the shelves in the marble contact paper. It was a bit tedious, but I took it slow to make sure I was measuring accurately. A few notes on covering the shelves:
- Each shelf was labeled with a part number (A, B, C, D), so I kept the part number stickers on the plastic bags they came in, to keep them straight.
- I covered both sides of each shelf since they’d be visible, but I only covered the front side of the back panels, since the back of the bookcase would be against a wall.
- I did not cover the short sides of the shelves because the color was similar to the color of the marble contact paper.
- You will need to poke holes in the contact paper where the pre-drilled holes are so you can easily line up the screws during assembly. I used a small nail to poke the holes.
- Be sure to smooth out all air bubbles and wrinkles so the shelves are smooth. The brand of paper I used (link above) was very easy to apply and went on smoothly.
- Use a sharp box cuter or X-acto knife to cut the contact paper to ensure a smooth and even cut and cut on cardboard so you don’t damage the surface of the counter or table where you are working


The hardware for this particular shelf from Target was all sorted and labeled by step number, which was AWESOME. Often, with furniture that requires assembly, all the screws, bolts, pegs, washers, etc are all dumped together so this was a treat to have them sorted and organized! When assembling, do NOT tighten all of the screws 100% until the entire bookcase is assembled, then go back as a final step and tighten down all the screws. It will be much easier to assemble if you do it this way.
When I was done with putting together the shelf, I sprayed a little bit of paint onto a paper plate, and using a cotton swab, touched up any of the spots that I scratched during assembly.


I’m really happy with how this turned out – and it wasn’t hard to do! The easy-to-follow instructions and the good quality of the parts really helped – all of the holes were drilled accurately and everything came together without any problems. The frame pieces were a little hard to slide together due to the paint on them, but with a little “elbow grease” they went together just fine.
Two cans of spray paint and four rolls of the contact paper were perfect for this project. I do have a lot of contact paper scraps left over, so I’m holding on to those for other potential projects. Total cost less than $120: Target Shelf, $75 , contact paper $30, spray paint $13


Super cute!
LikeLiked by 1 person
Thanks!
LikeLike