The project that just won’t end.
But we’re getting there!
Nearly a year ago my husband stumbled upon this wonderful property just a mile down the road from our subdivision. We had been searching, for years, for a property with at least a couple acres, out buildings, and a pool. Those properties are very hard to come by, so after taking a look at it we immediately made an offer the day it went on the market. So did 4 other people. Our offer was the best, so we ended up with it.


We knew from the beginning it was going to be a “gut job.” The home was screaming 1970’s. While there were a few updates, they weren’t really the kind of updates that we liked (not our style) so we found a contractor and began demo. And once you begin pulling back the walls, well you just never know what you’ll find.
I don’t want to bore you with the details, but we had setback after setback, problems with contractors (do NOT even get me started…), and a whole host of unplanned repairs and expenses. As I write this, nearly everything in this house has been replaced from every single inch of electrical wiring, the plumbing, and the roof to every wall, floor, light fixture, and even the well pump. Yes, the well pump went out during the final phase of work. Go figure. Nine months after we began demo, we finally moved in to our home.
It’s between 90% – 95% complete at this point. We still need to install shelving and hanging bars in all of the closets, install shower doors, hang the barn door on the laundry room, finish up some electrical work, and build out our wet bar in the living room. And that’s just the inside. We also have a long list of items we plan to upgrade and fix outside as well, like remedying a serious drainage problem causing erosion, installing a new retaining wall and fence for the pool, and some landscaping. Lots of landscaping.


None of these items are critical – well, except for my closet; that mess is on life-support and needs to be tackled ASAP – and we are able to live comfortably while we take our time to finish the rest of the items. I had always planned on putting together a before/after slide show once the work was complete, but it’s going to be a little bit before it’s all done, and I’ve been getting antsy to share our hard work with everyone. My husband put a lot of blood, sweat, and tears into this project and I’m so proud of his work. Chip and Joanna don’t have anything on Chip and Theresa!

I decided to go ahead and break this up into separate blog posts, so I can share with everyone what is currently done, and then as we go along I will share pictures of the additional work and progress that we make. Some of the “before” photos are from the original real estate listing, and some of them we took during construction.

The Great Brick Wall
The first thing that greeted us when we looked at the property was this huge brick wall in the living room, with a bare-bones fireplace off-center to the right. It was odd looking and not aesthetically pleasing. We decided to add some built-in shelves to cover half of the brick, and then added a mantel above the fireplace to frame it out and make it look more modern, and then finished it off with gray paint.


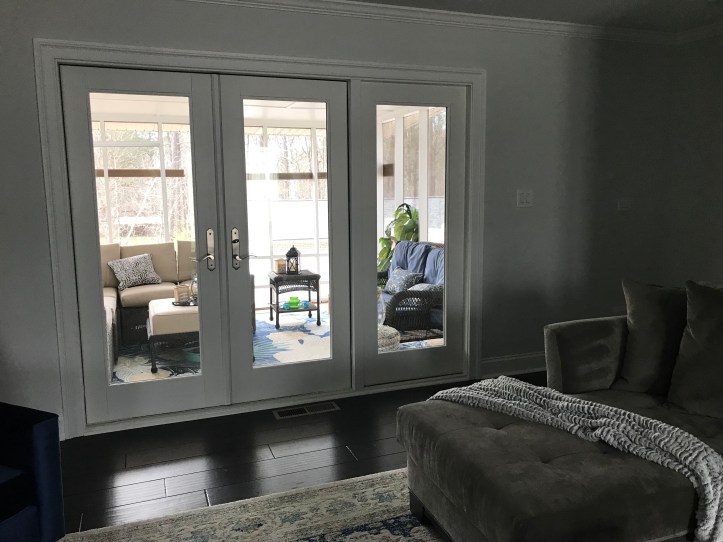
Additionally, I insisted on swapping the sliding glass doors in the living room that lead out to the screen porch with French doors. I always wanted to add French doors on the porch of our old house, and I didn’t like how the sliders were the first thing you saw upon entering the house. The French doors really add a nice touch, making the space more inviting.
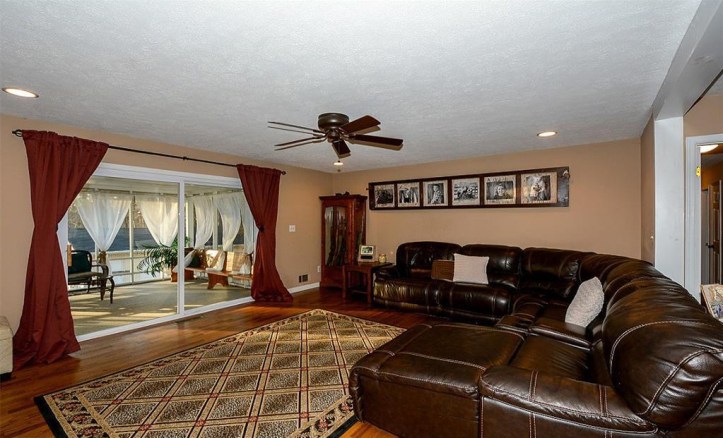
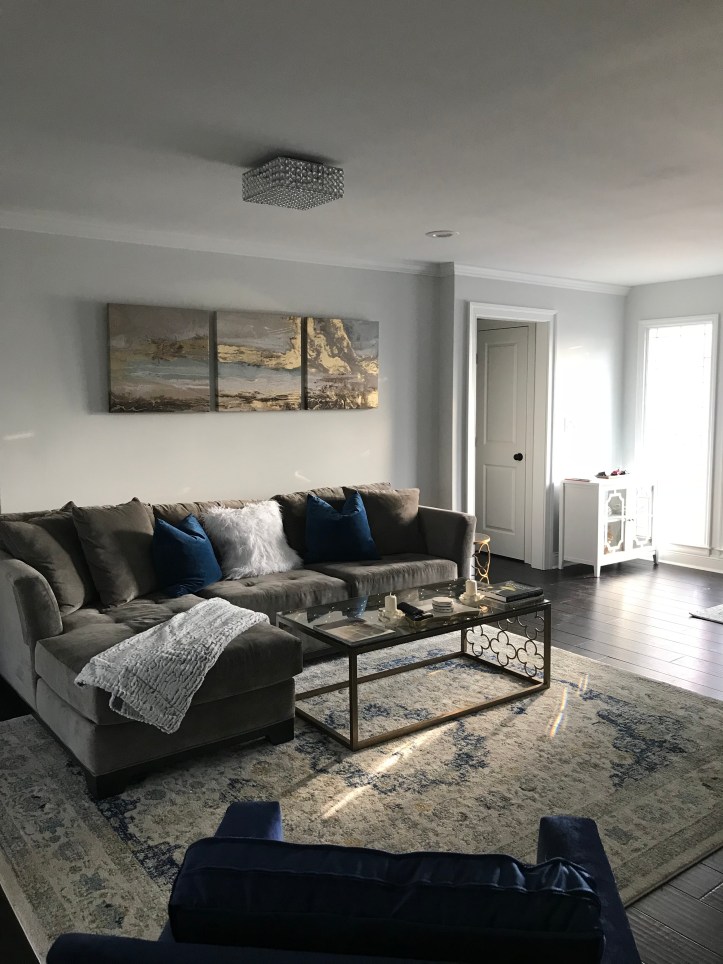
The living room also has new wide plank wood flooring, which runs throughout the entire first floor, can lights in the ceiling as well as some beautiful feature light fixtures, and freshly painted walls, however another big change is that we made the space smaller. Not something often done in remodels, but we wanted to make the master bath and closet area bigger so that meant stealing space from the living room. We accomplished this by moving the staircase over several feet. In doing this, it created a little nook that is going to make the perfect spot for a bar.


If You Build It They Will Cook
Even though it has beautiful cabinetry and very nice appliances, my previous kitchen was a bit small and dark and lacking in surface area. While I knew I wasn’t going to get everything on my wish list for my ultimate dream kitchen, we were able to get most of it in the space we had to work with. We changed out the woodgrain cabinets for white, added a farmhouse sink, and added a larger island, flipping it 90 degrees to create a large work surface with room for seating. We also decided to go for a contrasting color on the island, choosing a distressed black that balances out the white cabinetry. The island is topped with the same gray swirled marble-look granite that is throughout the rest of the kitchen.


Having a double oven was important to me, so we made space in the island for a microwave and replaced the existing oven with a double wall oven. We also installed a real exhaust hood above a professional grade gas cooktop and added a pot filler (because I’ve always wanted one!). Having a bright and well-lit kitchen is important to me, so we installed can lights in the ceiling as well as a large 3-light pendant over the island. For fun, my husband ordered a custom pantry door and we coordinated the light above it to match the island lights. Subway tile completed the look, with a custom tile feature wall above the cooktop.
The other big change in the kitchen we made was to open up the doorway, creating a more wide open space between the entryway, living room, and kitchen.


The dining room is located on the other side of the fireplace, adjacent to the kitchen. There wasn’t much to do in here besides flooring, new drywall, paint, and a new chandelier. We decided to keep the original sliding glass doors for now, as they are in good shape (and expensive to replace). The brick wall was painted the same color as the brick on the fireplace, and we added two recessed lights above it to highlight it.


Man Cave Transformation
The basement, like the rest of the house, was a complete re-do with the exception of the fireplace. To date, we haven’t decided what we want to do with it, so we left it as is for the time being. While the wood stairs are stained to match the main floor of the house, we chose water proof porcelain tile with a wood plank look for the basement. The basement does have some water problems currently so we wanted to ensure that the floors could withstand any potential floods/accidents.


By moving the stairs over, this made the kitchenette area a little bigger so we were able to put a full-size refrigerator down there. In fact, we moved the refrigerator that had been in the kitchen upstairs to the basement, as it was in excellent condition. The previous kitchenette was hilarious – totally 1970’s with the cabinets and wood paneling and funny little fridge. We went with dark wood cabinetry with textured glass doors, a modern tile backsplash, lighter colored granite countertops, and a small sink. We did leave space for a wine fridge that we will eventually add.


The previous guest room was transformed into Chip’s office by installing drywall and new flooring. It’s hard to get a good picture of the space, as my husband is still in the process of moving in his office, but you can see it is a major change from the blue cement block and wood paneled walls! Additionally, the Blue Bathroom is no more! We updated it with a new vanity, toilet, and shower (you can see we haven’t installed those shower doors yet!). We opted for no bathtub, as we rarely take baths, and it will make bathing the dog much easier!


There’s still a fair amount of work to do in the basement, besides finishing the bathroom, installing closet doors, and updating the fireplace.
The Rest Of The House
In future posts, I’ll share updates to the master bedroom and bathroom and my office, as well as other projects (like that living room bar!) as we finish them.
